Building a WordPress website has become super easy with the help of the Gutenberg block editor. This powerful block editor allows you to develop and design your website effortlessly without requiring technical skills.
This Gutenberg editor also helps you web design and manage content more easily than the traditional Classic Editor.
Whether you’re new to WordPress or looking to build a simple blog or a complex website, this WordPress Gutenberg block editor tutorial will guide you step-by-step through the process.
After working with a variety of clients such as small, medium, and enterprise-level, I have seen some common problems in the website like website speed and performance. There are many website builders such as Elementor, Divi, and Oxygen that increase the DOM size which directly affects the speed of your website.
Having several years of experience, I have found that staying with WordPress block editor is the best way to build a website with good speed and performance. It gives you a faster and more efficient experience without facing any issues with the website.
If you’re looking for an experienced professional to help you build and design your WordPress website, I’m here to help! I have years of expertise in WordPress development and have assisted numerous website owners in creating complex, customized sites that not only look great but also perform excellently.
Whether you’re starting from scratch or need someone to improve your current site, I have the skills and expertise to bring your vision to life.
Creating a website using WordPress requires knowledge of HTML, CSS, and other coding languages. In today’s digital world, the Gutenberg block editor in WordPress has revolutionized the process of creating responsive websites.
With the help of the Gutenberg block editor, you can simplify your web design process and easily Figma to WordPress Conversion. Gutenberg is a user-friendly editor.
If you’re unsure how to build a website using the WordPress editor tool, don’t worry! I’ve worked with many clients who wanted to create their websites using Gutenberg, WordPress’s block editor.
I can guide you through the process and help you create a website that meets your requirements. Whether it’s a simple blog or a complex responsive website, I’ve got you covered!
Gutenberg is the default block editor for WordPress, replacing the Classic Editor. This block editor was introduced with WordPress version 5.0 in December 2018. Gutenberg uses a block-based system, meaning every piece of content on the website (such as text, images, videos, etc.) is treated as a block.
It allows you to build web pages using blocks—individual components that can be easily manipulated and arranged.
This block editor allows you to add paragraphs, headings, images, videos, buttons, and embeds easily, without requiring technical knowledge. Each block has its settings, saving you time when customizing your website layout.
I can help you using the block editor to create a page. Me and my team are experienced in this Gutenberg block editor which will make your complex website easy and saves you time.
Choosing between the Gutenberg editor and the Classic Editor is an important decision for website owners. If you’re unsure about which option to choose for building your website in WordPress, don’t worry! I’ve created a table to help you make a quick and informed decision.
WordPress used the Classic Editor before the introduction of Gutenberg. The Classic Editor is similar to a word processor like Microsoft Word and requires some additional plugins and coding for building complex websites.
Let’s understand the key differences between them to help you choose wisely:
| Key Features | Classic Editor | Gutenberg Editor |
| Editing Style | It is a Text-based editor | It is based on Block-editor |
| Customization Options | Provides you a limited options | It gives you highly customizable options in the layout |
| Multimedia Handling | Offers you only Basic option in this editor | Offers you advanced media blocks |
| Third-Party Plugin Support | For advanced layout, you need other plugins and apps to install. | In this editor, you will be less dependent on external plugins. |
| Ease of Use | You need technical knowledge in this editor. | This editor is beginner-friendly. |
As you see above the key differences between the classic editor and Gutenberg plugin, A thought might have come to your mind that the Gutenberg block editor gives you more flexibility options and helps you to build dynamic and visually appealing websites as compared to the classic editor.
In my opinion, if you have a complex website you need to prefer a Gutenberg editor.
The Gutenberg block editor offers several advantages that make it a preferable choice for both new and experienced WordPress users:
When you are new and not familiar with WordPress Gutenberg editor, So I am guiding you about how the Gutenberg Editor Works in WordPress.
To become familiar with Gutenberg block editor, you need to know how to navigate and how to use it effectively because Gutenberg works in the block section and every block has a different purpose whether it’s for text, images, video, or columns.
So let me guide you on how it works:
Keyboard shortcuts help you to make the page-building workflow in Gutenberg faster and more efficient. I have created a handy table of common shortcuts that I frequently use while working with the Gutenberg editor.
| Action | Windows/Linux Shortcut | Mac Shortcut |
| Add new block | Ctrl + Shift + A | Cmd + Option + T |
| Duplicate Selected Block | Ctrl + Shift + D | Cmd + Shift + D |
| Remove Selected Block | Shift + Alt + Z | Shift + Option + Z |
| Undo Last Action | Ctrl + Z | Cmd + Z |
| Redo Last Action | Ctrl + Shift + Z | Cmd + Shift + Z |
| Save Draft | >Ctrl + S | Cmd + S |
| Open Block Navigation | Shift + Alt + O | Shift + Option + O |
| Open Settings Sidebar | Ctrl + Shift + , | Cmd + Shift + , |
| Preview | Ctrl + P | Cmd + P |
Using these shortcuts can significantly speed up your editing process.
Now you have a basic understanding of how the Gutenberg block editor works in WordPress, So it’s time to build and design your web page with this editor tool. Creating a web page in WordPress using the Gutenberg editor is a straightforward process. Below, I have explained in a detailed step-by-step guide to create a WordPress website using Gutenberg:
To start building your WordPress website, You need to set up a few essential things before starting. Please have a look below:
First, enter your domain name
< Now set up your admin account by selecting a username and Password < Done with the installation
< Log into the WordPress dashboard by visiting www.yourdomain.com/wp-admin using the same
< You will see a WordPress dashboard which is the control panel of your website.
Once the WordPress setup is done, You might need to ensure that the Gutenberg is enabled. As of WordPress 5.0, Gutenberg is the default editor.
Navigate to Settings > Writing and ensure that the “Default editor for all users” option is set to the Block Editor (Gutenberg).
Also keep this in mind that, if the Classic Editor plugin is installed previously, You have to deactivate or delete it from Plugins > Installed Plugins.
You are good to start building your web pages once you have confirmed that Gutenberg is enabled.
To start creating new pages you need to go to pages. On the left-hand menu, You have to click Pages. You’ll see a list of your existing pages (if any). To create a new one, click the Add New button at the top.
Then, At the top of the new page, you’ll see a field for your page title. Enter a descriptive title for your new page (e.g., “Home” or “About Us”) based on your web page.

As we mentioned earlier, Gutenberg works by using blocks for every element on the web page. These blocks allow you to add different types of content, such as paragraphs, images, headings, buttons, and more.
To add a block, click the “+” button at the top-left corner of the editor section, or you can click the plus sign inside the editor itself. Once you click the icon you will be able to see a variety of block options or you can also search for a specific block by category as per your requirement.

Below we are sharing some commonly used blocks for you:

In the Gutenberg block editor, you have the option to customize and rearrange every block of your web page. Each block has its own settings and customization options. After adding a block, you’ll see a toolbar with block-specific options.
Additionally, the right-hand sidebar gives you more detailed settings for each block, allowing you to customize typography, spacing, and block behavior.
If you want to rearrange the blocks on your web page you can use the up/down arrows in the toolbar section to move a block up or down the page. Apart from this you can click and drag the block to a new position. This functionality makes it easy to reorganize your content.

Gutenberg editor gives you the option to create complex layouts without requiring external page builders. Also If you need to design professional layouts on the web page, you can go with the columns and other advanced blocks.
If you want to add a column layout, you need to click the “+” button, search for “Columns,” and then select the block. You can select the number of columns you want (e.g., two, three, or four).
Every column on the page serves as its own space where you can include additional blocks containing text, images, and buttons.
Also, Gutenberg gives you a cover block option if you want to create a section with a full-width image and overlay text (such as a hero banner).
To go with this option you need to click the “+” button and search for Cover. Then you have to upload or choose an existing image from your media library. After that add a heading or paragraph over the image, and adjust the opacity and alignment accordingly.

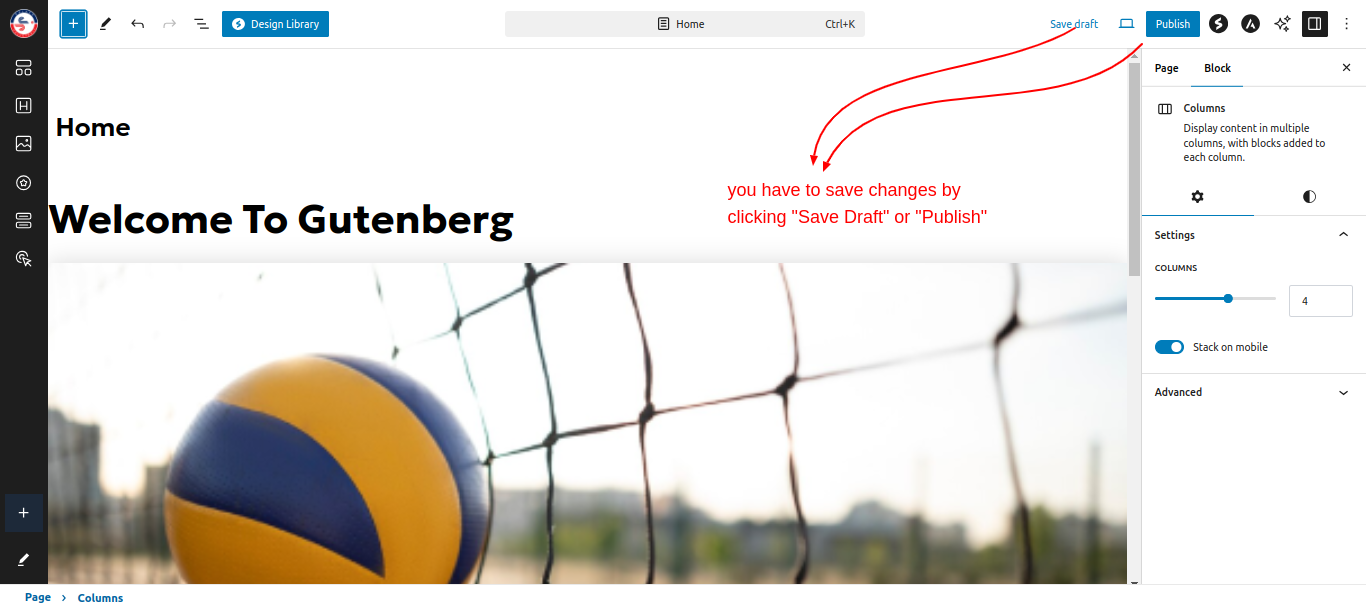
When you are done with adding all the necessary blocks and customizing them, you have to save changes by clicking “Save Draft” or “Publish”.
To preview how your page looks before publishing, click “Preview” in the top-right corner of the Gutenberg editor and choose to view it on desktop, tablet, or mobile to ensure it displays well on all devices.
Now it’s time to publish your page design, Select the Publish button. You can also schedule it for a future date.
Finally, Your page is now live and accessible to your users!
With these best practices and the guidance provided above, you’re well on your way to building professional, responsive, and dynamic WordPress websites using the Gutenberg block editor.
But if you are still confused and need expert support then I can help you to build the website.
Gutenberg block editor is a user-friendly and powerful tool that makes building a WordPress website easy and accessible to everyone, regardless of experience. With its block-based editor tool, you can add and customize content effortlessly, whether it’s simple text, images, or complex layouts.
Gutenberg gives you the flexibility to design with ease, allowing you to focus more on creating great content rather than worrying about technical details.
Now that you understand how to use the Gutenberg editor, you’re ready to start building your WordPress-responsive website and bring your ideas to life!
ControlF5 helps you to build a WordPress website using the Gutenberg editor tool. We have an experienced team of WordPress developers who are updated with the latest trends and updates of WordPress.
For further details, you can contact me and our team that helps you build your WordPress website based on your specific needs and requirements.
Ans- Gutenberg is the block-based editor for WordPress that revolutionizes content creation by allowing users to build pages using various blocks like text, images, and videos. It increases the editing experience, making it easier to create visually appealing content without needing coding skills.
Ans- Gutenberg comes pre-installed with WordPress versions 5.0 and above, so no additional installation is necessary. If you’re using an older version, you can install the Gutenberg plugin from the WordPress plugin repository and activate it through the Plugins menu in your dashboard.
Ans- Yes, Gutenberg allows extensive customization through its block system. You can rearrange blocks, adjust their settings, and create reusable blocks for consistent design across your site, enabling you to customize your layout to your needs.
Ans- Gutenberg offers a user-friendly interface with drag-and-drop functionality, a variety of content blocks, and the ability to create reusable blocks. It also supports patterns for quick layout design and integrates seamlessly with many plugins to increase functionality.
Ans- To optimize for SEO in Gutenberg, You must ensure that you use appropriate heading tags (H1, H2, etc.) within your content blocks. Additionally, consider installing SEO plugins like Yoast SEO that integrate with Gutenberg to help you manage meta descriptions and focus keywords effectively.
Ans- Key plugins to increase your Gutenberg experience include Yoast SEO for search optimization, Essential Blocks for additional design options, and WP Super Cache for performance improvement. These plugins can significantly improve functionality and user experience on your website.


Just planning and building an ecommerce store is not enough. Creating a high-converting e-commerce store is equally important because every business owner’s ultimate goal is to grow their online business and drive consistent sales.

In today’s fast-paced digital era, every user now depends on mobile apps and they order directly from their mobile without wasting time by going to shop. Just like clothes, electronics, and more can be online as same grocery items can also be ordered with just a few taps.

Launching an e-commerce website is a crucial step toward expanding your online business and reaching a wider audience
In today’s digital world, having a well-designed and functional website is essential for success. However, creating a great ecommerce website design requires proper planning and execution.